cPanel on Windows – cPanel is a powerful web-based control panel that simplifies website management tasks. While it is commonly associated with Linux-based hosting environments, it is also available for use on Windows servers. In this article, we will explore how to use cPanel on Windows and make the most of its features.
Introduction to cPanel on Windows
cPanel is a user-friendly control panel designed to make website management accessible to users without technical expertise. It offers a wide range of tools and features to simplify tasks such as file management, domain management, email configuration, database management, and more.
What is cPanel?
cPanel is a web hosting control panel that provides a graphical interface and automation tools to simplify website management tasks. It allows users to easily perform various administrative functions without needing extensive technical knowledge. cPanel offers a user-friendly interface and is widely used by web hosting providers around the world.
Benefits of Using cPanel on Windows
Using cPanel on Windows provides several benefits for website owners and administrators. Some key advantages include:
- User-Friendly Interface: cPanel offers an intuitive and user-friendly interface that makes it easy to navigate and manage websites.
- Wide Range of Features: It provides a comprehensive set of features for website management, including file management, domain management, email configuration, database management, security settings, and more.
- Automation and Efficiency: cPanel automates many routine tasks, saving time and effort for website administrators.
- Compatibility: cPanel is compatible with various web hosting environments, including Windows servers.
- Third-Party Integrations: It integrates with popular applications and software, allowing easy installation and management of additional functionalities.
Accessing cPanel on Windows
To access cPanel on Windows, follow these steps:
Step 1: Logging into cPanel
- Open your preferred web browser and enter the URL provided by your web hosting provider.
- Enter your cPanel username and password in the login page.
- Click the “Log in” button to access your cPanel dashboard.
Step 2: Navigating the cPanel Interface
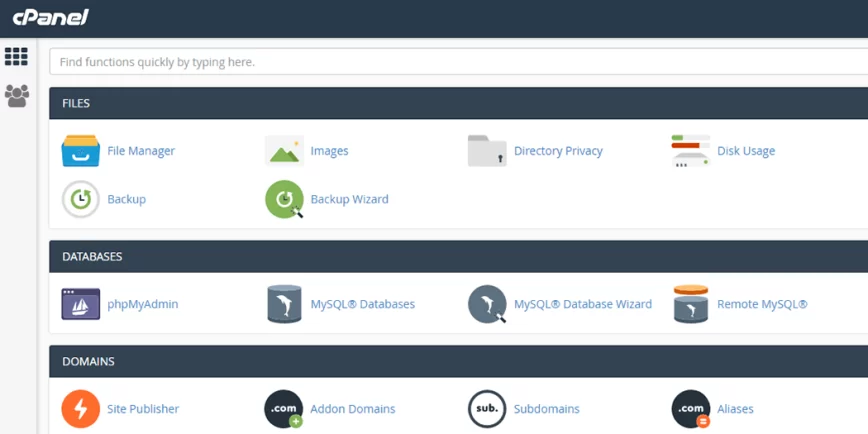
Once logged in, you will see the cPanel interface with various icons representing different features and settings. Here are some commonly used sections:
- Files: Allows you to manage files and directories, upload files, and set file permissions.
- Domains: Provides options for adding and managing domains, subdomains, and domain redirects.
- Email: Allows you to configure email accounts, forwarders, autoresponders, and spam filters.
- Databases: Offers tools for managing databases, creating backups, and configuring database users.
- Security: Provides options for configuring SSL certificates, managing firewalls, and setting password-protected directories.
Managing Files and Directories
cPanel on Windows allows you to easily manage files and directories on your website. Here are some key file management tasks:
Uploading Files
- Navigate to the “Files” section in cPanel and click on the “File Manager” icon.
- Select the directory where you want to upload the file.
- Click on the “Upload” button and select the file from your computer.
- Once the upload is complete, the file will be available on your website.
Creating Directories
- Go to the “Files” section in cPanel and click on the “File Manager” icon.
- Select the directory where you want to create a new directory.
- Click on the “New Folder” button and enter a name for the new directory.
- Press “Create New Folder” to create the directory.
Managing Domains and Subdomains
With cPanel on Windows, you can easily manage your domains and subdomains. Here’s how:
Adding a Domain
- In the “Domains” section of cPanel, click on the “Addon Domains” icon.
- Enter the domain name and other required details.
- Click the “Add Domain” button to add the domain to your hosting account.
Creating Subdomains
- In the “Domains” section of cPanel, click on the “Subdomains” icon.
- Enter the subdomain name and select the domain where you want to create the subdomain.
- Click the “Create” button to create the subdomain.
Email Management with cPanel
cPanel on Windows provides robust email management capabilities. Here’s how you can set up email accounts and manage them:
Setting up Email Accounts
- In the “Email” section of cPanel, click on the “Email Accounts” icon.
- Enter the desired email address and select the domain.
- Set a password for the email account and configure additional settings if needed.
- Click the “Create Account” button to create the email account.
Managing Email Forwarders
- Go to the “Email” section in cPanel and click on the “Forwarders” icon.
- Click the “Add Forwarder” button.
- Enter the email address for which you want to set up forwarding.
- Specify the destination email address where you want the emails to be forwarded.
- Click the “Add Forwarder” button to save the settings.
Database Management
cPanel on Windows offers efficient tools for managing databases. Here’s how you can perform common database management tasks:
Creating Databases
- In the “Databases” section of cPanel, click on the “MySQL Databases” icon.
- Enter a name for the new database and click the “Create Database” button.
- Create a new database user and assign privileges to the user for the database.
- Click the “Add User to Database” button to complete the setup.
Importing and Exporting Databases
- In the “Databases” section of cPanel, click on the “phpMyAdmin” icon.
- Select the database you want to import/export from the left-hand side panel.
- Click on the “Import” or “Export” tab, depending on your needs.
- Follow the on-screen instructions to import or export the database.
Website Backup and Restoration
Regular backups are essential for website security and disaster recovery. Here’s how you can backup and restore your website using cPanel:
Backing up Your Website
- In the “Files” section of cPanel, click on the “Backup Wizard” icon.
- Click on the “Backup” button to start the backup process.
- Choose whether you want a full or partial backup.
- Follow the prompts to select the directories and files you want to include in the backup.
- Click the “Generate Backup” button to create the backup file.
Restoring from a Backup
- In the “Files” section of cPanel, click on the “Backup Wizard” icon.
- Click on the “Restore” button.
- Select the backup file you want to restore from.
- Follow the instructions to choose the files and directories to restore.
- Click the “Restore” button to initiate the restoration process.
Security Features in cPanel
cPanel on Windows offers various security features to protect your website. Here are some important security-related tasks:
Enabling SSL Certificates
- In the “Security” section of cPanel, click on the “SSL/TLS” icon.
- Select the domain where you want to enable SSL.
- Follow the instructions to generate and install an SSL certificate.
Configuring Firewall Rules
- In the “Security” section of cPanel, click on the “Firewall” icon.
- Set up rules to allow or block specific IP addresses or ranges.
- Configure additional security settings as per your requirements.
Installing Applications with Softaculous
cPanel on Windows includes Softaculous, a one-click application installer. Here’s how you can install applications using Softaculous:
- In the “Software” section of cPanel, click on the “Softaculous Apps Installer” icon.
- Choose the application you want to install from the available options.
- Follow the on-screen instructions to complete the installation.
Managing DNS Records
cPanel on Windows allows you to manage your DNS records easily. Here’s how you can do it:
- In the “Domains” section of cPanel, click on the “Advanced DNS Zone Editor” icon.
- Select the domain for which you want to manage DNS records.
- Add, edit, or delete DNS records as required.
Monitoring Website Traffic
cPanel provides various tools to monitor your website’s traffic and performance. Here’s how you can access these features:
- In the “Metrics” section of cPanel, you will find tools like “Awstats” and “Webalizer” for website analytics.
- Click on the respective icon to view detailed reports on visitor statistics, page views, and more.
Troubleshooting Common Issues
If you encounter any issues while using cPanel on Windows, here are a few common troubleshooting steps:
- Clear your browser cache and try accessing cPanel again.
- Check your internet connection to ensure it is stable.
- Review the cPanel documentation or contact your hosting provider for support.
Conclusion
In conclusion, cPanel on Windows provides a user-friendly and efficient way to manage your website. Whether it’s managing files, domains, emails, databases, or ensuring security, cPanel offers a comprehensive set of features to simplify these tasks. By following the outlined steps and utilizing the various tools available, you can effectively use cPanel on Windows and streamline your website management process.
Frequently Asked Questions (FAQs)
Q1: Can I use cPanel on Windows servers? Yes, cPanel is available for use on Windows servers, offering similar functionality to its Linux-based counterpart.
Q2: Is cPanel suitable for beginners? Yes, cPanel is designed to be user-friendly and accessible for users without technical expertise, making it suitable for beginners.
Q3: Can I manage multiple domains using cPanel on Windows? Yes, cPanel allows you to manage multiple domains by adding them as addon domains or creating subdomains.
Q4: Can I backup and restore my website using cPanel on Windows? Yes, cPanel provides backup and restoration tools, allowing you to safeguard your website and restore it if needed.
Q5: How can I access the cPanel interface on Windows? You can access the cPanel interface by logging into your hosting account and following the provided cPanel URL or by contacting your hosting provider for the access details.


com Domain Registration | Buy a .com Domain Name Today
Search The Domain Name You Want com Domain Registration – The internet has become an
-

Best Ransomware Detection Techniques
22 May 2023 -

What is Drupal used for?
22 May 2023 -

Is PrestaShop a CMS or Framework?
22 May 2023